2011年10月10日 星期一

[WebGL] Pass an array into fragment shader

At this moment (10/10/2011) is impossible!!

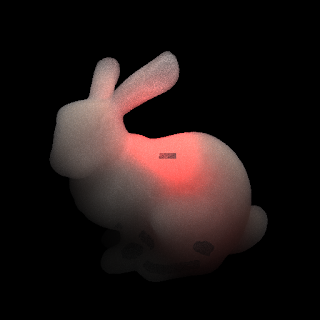
I wanna do multiple light sources so I have to pass a series of locations. The only way to do it now is to use texture. At this moment, webGL does support floating-point texture but my graphics card however doesn't. Here is the link to see if your card supports it (www.kludx.com/opengl_versions.php)

Here is the code to move your data into the texture:

var pix = [];
for from i=0 to n
{
for from j=0 to n
{
var x=...
var y=...
var z=...
pix.push(x,y,z);
}
}

Where n is the size of your array. I've searched on the internet, saying that using 2D array is better than 1D either performance is better or some of the hardware doesn't support 1D texture. So if you want a 1D array just use nx1 2D texture.

Here is the code you set up the texture:

texture = gl.createTexture();
gl.activeTexture(gl.TEXTURE0);
gl.bindTexture(gl.TEXTURE_2D, texture);
gl.pixelStorei(gl.UNPACK_ALIGNMENT,1);
gl.texImage2D(gl.TEXTURE_2D, 0, gl.RGB, 32, 32, 0, gl.RGB, gl.FLOAT, new Float32Array(pix));
gl.texParameteri(gl.TEXTURE_2D, gl.TEXTURE_MAG_FILTER, gl.NEAREST); gl.texParameteri(gl.TEXTURE_2D, gl.TEXTURE_MIN_FILTER, gl.NEAREST);

However, if your card doesn't support floating-point texture (like mine,) you have to use fixed point texture.
gl.texImage2D(gl.TEXTURE_2D, 0, gl.RGB, 32, 32, 0, gl.RGB, gl.UNSIGNED_BYTE, newUint8Array(pix));

And then you can set up the shader parameters and access the texture like the normal image textures.

[Ignore this part if you can use floating-point texture]
If you only can use fixed point texture. The input value will be automatically scaled from [0,255] to [0,1]. So you will lose some precision and also you will have a fixed range of data. If you want to have data in [-100,100], All you have to do is to scale to [0,255], get [0,1] in the shader and then scale back to [-100,100]

2011年10月6日 星期四

Project Journal 10/06 [Multiple Light Sources]

[Finished]
1. Part of the scene graph. Now it can add transform groups, and models. Besides, it can change the model matrices under the transform groups.
2. Model loading: The model hierarchy is Scene->Transform Group->Model->Mesh.
A Scene can contain several Transform Group.
A Transform Group can have other transform groups and Models.
A Model will contain several meshes that compose of ONE entire model.
A Mesh is where the real vertices locate. A complicated model might have several meshes object.

[To do]
1. Multiple Light Sources:
I just found out that in webGL, pixel shader doesn't support uniform array indexing which means you can pass an array into the shader but only the vertex shader can access it.
So to do multiple light sources, the only way is to use texture.

Quote:
http://www.khronos.org/registry/webgl/specs/latest/#DYNAMIC_INDEXING_OF_ARRAYS "WebGL only allows dynamic indexing with constant expressions, loop indices or a combination. The only exception is for uniform access in vertex shaders, which can be indexed using any expression."

2011年10月4日 星期二

Work Journal 10/04

[Finished]
1. Place of indication selection system. (Interactively select the place you want to highlight)

[Bug]
1. The mini lights don't work along with global light sources.
2. Some selected place don't have light emitted there.

2011年10月3日 星期一

Project Journal 10/03

[Finished]
1. I've finished the new model loading mechanism. I use the utf8 model format from the google group. It works pretty good.
2. New scene management utilities are installed named "spidergl." It provides the basic animation like function: load, update, draw.

[To Do list]
Since I've changed pretty much the whole architecture, there are many things need to be fixed.

1. A strong aliasing shows up in the model.
2. Lighting.
3. Scene control (like where to add lights and where to add new objects.)
4. Draw functions.

2011年10月1日 星期六

Project Journal 10/01

[Finished]
1. Per pixel shading
2. OOP design

[To DO List]
1. Scene graph
2. Model importing
3. Multiple light sources

Nice website for normal matrix

When importing an object, both the vertices and normals are defined in Object Space. However, in the shader, if we want to do the calculation in camera space, we multiply the vertex with the Model View Matrix (M) to make it from object space to world space but we multiply (M^-1)^T
with the normal to make it from object space to world.

This article is pretty clear why there is the difference.

2011年9月29日 星期四

Work Journal 9/29

I embedded the light under 1 unit along the normal direction under the surface. The outcome should be several disk light sources embedded under the mesh.

[To Do]
1. Control the scattering and absorption and the intensity of the light.
2. Fix the brain mesh.
3. Test several light sources


2011年9月27日 星期二

Work Journal 9/27

I have tried several ways to make to media glows from the inside but not too transparent. However, if I set the scattering and absorption rate too high, the light can't come out.

[Bunny Model]


[Brain Model with External Lighting]


[Brain Model with Internal Lighting]


[To do Next]
*a bug when I place the square light inside. (Didn't occur when using the bunny model.)


* Find out a proper parameter to see as a light in fog.

2011年9月26日 星期一

Work Journal 9/26

[Might be problematic]
BVH (if too many triangles or the objects are scattered everywhere, it might be a problem)
Photon mapping (due to the limit of the memory, if too many photons are used, it will crash)

[Finish Today]
The "Media" object now is fully controllable.
High scattering, high absorption will result in close to diffuse objects.
Low scattering, low absorption will give more translucency.

[Next goal]
Multiple light sources inside the object.
I'm not sure how it will look like. I will set the scattering and absorption low to make the light from inside can go out.
No clue if it will look like the wax object in the reference picture.

One more thing, set the reflection to white might be working without global tone mapping.

2011年6月26日 星期日

[Parallel Computing] Sorting

I adopted the odd even sort for sorting on GPU. I use NVIDIA GeForece 9400M, which has the spec (only list related):
CUDA capability 1.1:
1. Max number of threads per block: 512
2. Max blocks in x direction of a grid: 512
3. Shared memory size: 16K
4. Global memory size: 256M

For my application:
Each item in the list: 16 bytes
Usually the size of the list is larger than 1024.

In my implementation, a thread is assigned with two elements in the list. A block containing maximum number of threads (512) can manage 1024 items. In my implementation, the whole list doesn't fit in one block, and inside a block, the elements don't fit in the shared memory. Therefore, I had to use multiple blocks (usually 30~60 blocks) to accomodate the list. Unfortunately, CUDA only provides with us thread synchronization within a block. For interblock synchronization, I have no choice to relaunch the kernel multiple times.


Result:
Sorting 438270 items
CPU version: 86s (This version is not optimized, just want to verify the correctness of GPU version)
GPU version: 504ms

2011年6月22日 星期三

[Parallel Computing] Indexing tricks

When making device kernels (shaders,) how to assign threads to some tasks is very important.
Since the GPU has really little support of recursion, how to turn your recursive program into a non-recursive one becomes very important as well.

I saw this approach when I was working on GPU sorting.
The original Odd Even Merge Sort is described here

I'm not gonna describe the iterative version in detail but mention some tricks to accustom your code to the GPU kernel.

1. When your code has the thread assignment with a circular pattern:
For example:
8 Threads:
Thread Id 0 1 2 3 4 5 6 7
Activate/no n n y y n n y y

Solution:
Here we have a circular pattern with a period of 4.
Of course we can use something like if(Idx.x==xxx), but if the case is making an iterative execution, there will be too many cases to be considered.
A better way is to use (Idx & (period-1)) and set a threshold.
In our example, we can use (Idx&3) and set a threshold equal to 2.
So the values become:

Thread Id 0 1 2 3 4 5 6 7
Activate/no n n y y n n y y
Value 0 1 2 3 0 1 2 3
Thresholded n n y y n n y y

So it's exactly what we want for our program.